
When creating an application with Spring Boot, our to-go unit testing framework is JUnit and Mockito for mocking dependencies.
For me personally, I like using the Spock Framework for my unit tests. With Spock you can take advantage of the Groovy language syntax and enhanced by Spock through Groovy's metaprogramming features. This combination of features makes your unit tests more expressive and easier to read (and write!)
Setting up Spock in Gradle
In the plugins section of the build.gradle file, the groovy plugin must be installed. This tells Gradle to look at src/{main,test}/groovy directories for Groovy source codes to compile.
plugins {
  id 'groovy'
  // other plugins...
}
Next, we also need to install Spock-related dependencies:
dependencies {
  // other dependencies...

  testImplementation libs.springBoot.test
  testImplementation libs.bundles.spock
}
Notice in my example that I am using Gradle's dependency version catalog. Here is how libs.springBoot.test and libs.bundles.spock is declared in the settings.gradle file:
dependencyResolutionManagement {
  versionCatalogs {
    libs {
      def springBoot = version('springBoot', '3.2.2')
      def spock = version('spock', '2.4-M1-groovy-4.0')
      // other versions...

      library('spock.core', 'org.spockframework', 'spock-core')
        .versionRef(spock)
      library('spock.spring', 'org.spockframework', 'spock-spring')
        .versionRef(spock)
      bundle('spock', ['spock.core', 'spock.spring']) // use this bundle alias in build.gradle

      library('springBoot.test', 'org.springframework.boot', 'spring-boot-starter-test')
        .versionRef(springBoot)

      // other libraries, bundles, etc...
    }
  }
}2.4-M1-* because of a fix for Spring Boot 3 / Spring 6. The *-groovy-4.0 suffix of the version is the Groovy language version this dependency is bundled with; language versions *-groovy-2.5 and *-groovy-3.0 are also available.Using the dependency version catalog is a choice. Therefore, installing dependencies using the group:artifact:version format is valid:
dependencies {
  // other dependencies...

  testImplementation 'org.springframework.boot:spring-boot-starter-test'
  testImplementation "org.spockframework:spock-core:${spockVersion}"
  testImplementation "org.spockframework:spock-spring:${spockVersion}"
}
Now that we installed the dependencies to use Spock (spock-core), use Spring-related features (spock-spring), and its runner platform (spring-boot-starter-test), we can now create unit tests with Spock!
Write Unit Test Files
Create a Groovy test file (or what Spock calls a Specification) in the src/test/groovy directory in your project.
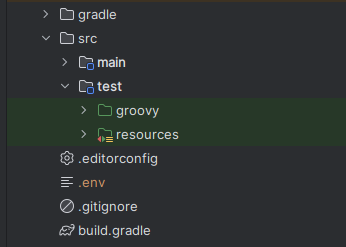
Remember that Spock looks for specifications in the groovy directory, not java. This works because you are using the 'groovy' plugin in the build.gradle file.
Now that the specification file has been created, its time to write our Spock tests using the Groovy language.
Creating the Specification Class
The Specification class defines the methods that will be used to test the system under test.
package ph.kana.spocktest.util

import spock.lang.Specification

class MapUtilsSpec extends Specification {
  // fixture methods goes here...
  // feature methods goes here...
}MapUtilsSpec is testing the methods in MapUtils class.Just like in JUnit, the test package is the same package as the system under test.
Make sure that the specification class inherits the spock.lang.Specification class. All Spock specification classes should inherit this class.
The Fixture Methods
A fixture method is used to setup the feature methods before they run. JUnit offers the same capability by using annotations. In Spock, if a method is named with one of the fixture method names, it will work as a fixture.
| Spock Fixture Method | JUnit Annotation |
|---|---|
setupSpec() |
@BeforeAll |
setup() |
@BeforeEach |
cleanupSpec() |
@AfterAll |
cleanup() |
@AfterEach |
Unlike in Mockito that you can just use @InjectMocks to setup mocks in the system under test, you have to setup mocks manually in Spock. This is done in the setup() fixture:
class UserServiceSpec extends Specification {

  private UserRepository userRepository = Mock()
  private UserService userService

  def setup() {
    userService = new UserService(userReppository)
  }

  // feature methods...
}setup() fixture method.Creating the Feature Methods
Feature method tests the system under test. Unlike JUnit where you need to annotate the test methods with @Test, Spock treats public methods with blocks as a feature method.
By convention, feature methods are named using String literals (a feature of the Groovy language). This will help describe the feature in a more expressive manner.
def "getValueThenTransform should apply transformation to map value given a key"() {
  given:
  def map = [key: 'value']

  when:
  def result = MapUtils.getValueThenTransform(map, 'key', String::toUpperCase)

  then:
  'VALUE' == result
}methodName (expectation) (given)Blocks
In the example above there are lines with given:, when:, and then: labels. Those labels signifies the start of a block. Blocks are used to divide and implement parts of a test and some Spock magic happens behind the scene on some blocks.
I usually use the given-when-then blocks when writing tests.
The given block contains the setup for the feature – declarations and mocks are done here.
The when block is the stimulus of the system under test. In this block the method under test is called, and sometimes the return value is captured in a variable.
Finally the then block contains the assert conditions for the feature. Just write boolean expressions in this block, and Spock will interpret them as assertions.
Exception checking is also done in then block:
def "saveUser should throw exception when given null user"() {
  given:
  def user = null

  when:
  userService.saveUser(user)

  then:
  thrown InvalidUserException
Interaction checks are also done in then block:
def "saveUser should save valid user to database"() {
  given:
  def user = buildValidUser()

  when:
  userService.saveUser(user)

  then:
  1 * userRespository.save(user)
}
There's also the expect block that works just like the then block. It is used to simple one-liner tests:
def "addition should work as usual"() {
  expect:
  2 == 1 + 1
}
It is also possible to perform a local cleanup of resources using the cleanup block. I rarely use this block, but when I do it is usually for deleting temp files.
And of course, there is the where block – the reason why I keep coming back to Spock. The where block contains setup for the variables that will make the feature parameterized. Unlike in JUnit where you need different @*Source annotations to setup your parameterized test, you can make it prettier using Spock's where block:
def "addition should work as usual"() {
  expect:
  result == a + b

  where:
  a | b | result
  1 | 1 | 2
  2 | 3 | 5
}
Behind the scenes, when using a where block, multiple versions of the feature method is being created with the values of the local variables being different.
Conclusion
Spock is a good alternative to JUnit, and can be easily installed in your Spring Boot project using Gradle (and Maven, which is not shown.)
Make sure to write your specification classes in src/test/groovy.
With Spock, you can take advantage of Groovy language's powerful features and short-hand syntax. Combine this with Spock powerful features, like parameterizing test with where block.
Other than what is written in this article, Spock has more feature that sets it apart from other unit testing frameworks. For example is the interaction-based testing and argument capturing that is more consise than Mockito verifications and @Unroll-ing parameterized methods.
Writing with Spock and Groovy makes your unit tests more readable and maintainable. Remember that Test code is just as important as production code (Robert C. Martin, Clean Code, Chapter 9).