
And yet here I am again to start another project that I might not complete as usual. This kinda becomes a meme in various programming groups – a developer starts a project with overflowing inspiration and plans, and never finishes it.
I hope this article will serve as a good note for my future projects that might not be completed, or to you my good readers that really needs to start a project with a similar setup as mine:
- Java 11 – This is the latest LTS version. The reason I chose this version of Java because this version Java Platform Module System or simply "Java Modules". I want to play around more with Java Modules since I never had much chance to do so. At first, I tried using Java 14 to play around with its preview features. It doesn't sit well with me since the
recordtypes did not work properly with JavaFX. - JavaFX – I still have a lot to learn with JavaFX, that's why I chose to work with JavaFX. In this project, I used version
11.0.2. I love how JavaFX matched their version number with JDK's versioning. It is now easier to know which JavaFX version works with the installed JDK. - Gradle – I just needed the dependencies and its setup be portable as possible. I had a project like this before, and integrating Java Modules with JavaFX was hellishly difficult. Now, with Gradle I hope to make it easier.
To be honest, at this point, I have thoroughly decided the tech stack to use but not the application to make. Then I remembered an app that I want to make before – a question shuffler.
What I want to make is an application that accepts a set of questions then print them in a PDF file. The user should have the option to print the questions in random order. This is back at the times when I wanted to learn PDF creation. This will be the right time to bring it back!
I decided to call this application: Exam Confetti. The root package will be: ph.kana.examconfetti.
Setup
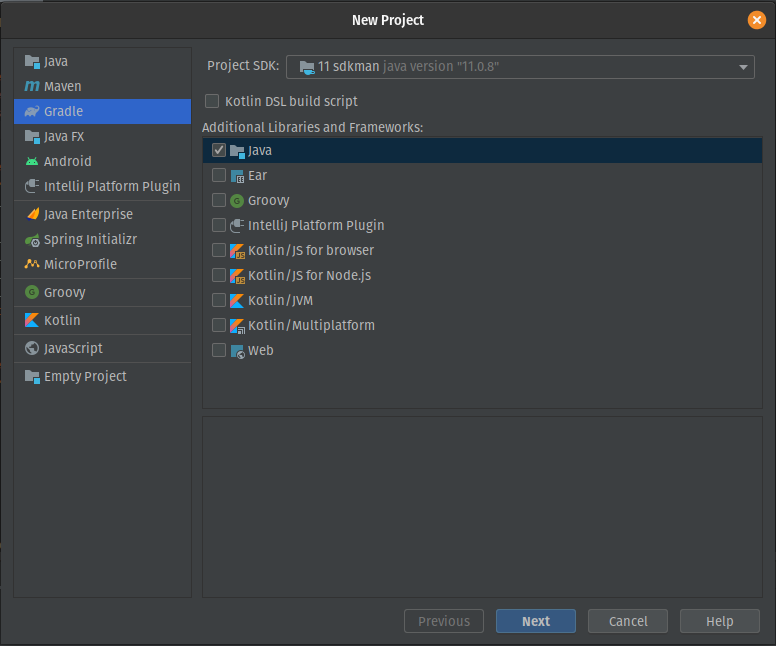
I have already done with the basics: like installing JDK and Gradle using SDKman. I generated my Gradle project using IntelliJ. After building the project, boilerplate files were added such as .gitignore and .editorconfig files.
With the setup I have in mind, the generated structure by IntelliJ does not fit the bill. I tried deleting the files and directories generated. My plan is to give the modules their own src directory and build.gradle files.
Modules
Now, I need to build the modules where I will write the actual code to build the application. Since I haven't thought much on how to do this, I kinda followed the Clean Architecture.
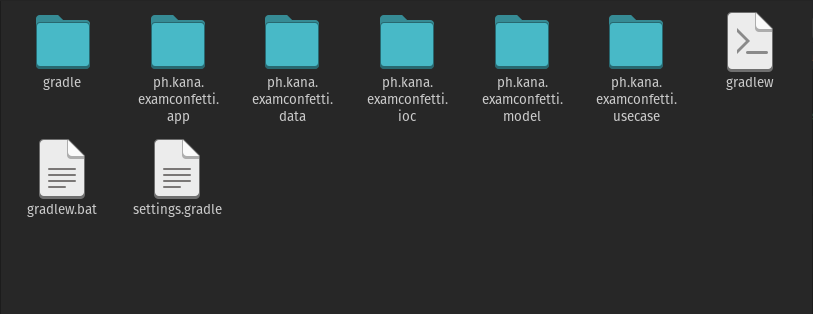
With this, my modules are:
model– Contains the model classes.usecase– According to Uncle Bob's Clean Architecture, use-case layer contains the application business rules. This module will work just like that, too.data– This will contain the classes that will communicate with the file system. Since the application I plan uses heavy file I/O, this module will be very busy.app– This module will contain the JavaFX framework. Everything related with GUI creation, like.fxmlfiles,.cssfiles, and the application runnermain()method will be in this module.
Now, I hit a snag. I don't know how to make the modules communicate with each other. First thing I thought is to use Spring Framework. Dependency Injection with Spring will make it simple but I see this an opportunity to experience making my own IoC container. Then so be it, my 5th module:
ioc– IoC container's module. My plan is to make this Spring Framework style, just like its.getBean(Class<?>)method.
After the (empty) modules are created, these modules should be added at settings.gradle file in the root directory of the project. This allows Gradle to see the modules as part of your project and be usable. When using IntelliJ's Right Click → New → Module... these settings will be automatically added.
rootProject.name = 'exam-confetti'
include 'ph.kana.examconfetti.model'
include 'ph.kana.examconfetti.usecase'
include 'ph.kana.examconfetti.app'
include 'ph.kana.examconfetti.data'
include 'ph.kana.examconfetti.ioc'
settings.gradle file.In this settings.gradle file, notice that the module name follows naming convention stated in Oracle's JLS page – following the name of its principal package, for Exam Confetti the the packages will start with ph.kana.examconfetti. Since the module names has dots in its name, the directory names has literally dots in it, too.
Writing Parts of the System
Boilerplate build.gradle File
Since I'm working with modules now, the configurations of each modules are independent from each other. A down side of it is the build.gradle file is repeated among the modules.
plugins {
    id 'java'
}

group 'ph.kana.examconfetti'
version '2020.10.0'

repositories {
    mavenLocal()
    mavenCentral()
}

dependencies {
    implementation('org.projectlombok:lombok:1.18.12')
    annotationProcessor('org.projectlombok:lombok:1.18.12')
}build.gradle file that will be used among the modules.The setup is pretty basic. There's the java plugin installed, the group name and version are defined. As for the version 2020.10.0 – I copied how IntelliJ version numbers work, with minor changes. Instead of writing only the year, I also added the month of release. The last number is still the release number.
Also, I added lombok dependency since I'm used to writing Java code with it. So, there it goes!
Another change is I added mavenLocal() repository. This will help downloads since this will make Gradle look at my local maven repository rather downloading from Maven Central outright.
I tried running the Gradle script to test if it's working, I noticed a problem with lombok. My module can't see it even if it is added in it module-info.java file.
module ph.kana.examconfetti.model {
    requires static lombok;
    exports ph.kana.examconfetti.model;
}
module-info.java file of the model module. lombok is properly added there.After a lot of inquiries and trial-and-errors, I learned that configuring the module paths using the 'java' plugin fix this. This is done by adding this block to build.gradle file.
plugins.withType(JavaPlugin).configureEach {
    java {
        modularity.inferModulePath = true
    }
}Actual Java Programming
Model and Use-Case Modules
Since the project follows the Clean Architecture, working with Model and Use-Case will be the first in line due to 2 reasons:
- These modules should be POJO – no frameworks. But in this project, I violated this rule by using
lombok. I ain't a Clean Architecture purist, so I made a few exceptions. I set a rule that onlylombokwill be used in the Model and Use-case classes. - Since the classes in these modules are POJO, it means that they have no or little dependencies. In the case of Model module, it has no dependencies from my other modules. The Use-Case module depends on the Model module. nothing else. Use-Case classes are supposed to do all the business rules with the features provided by the programming language alone.
module ph.kana.examconfetti.model {
    requires static lombok;
    exports ph.kana.examconfetti.model;
}
module-info.java of model module. See that it only requires the lombok module and nothing else.module ph.kana.examconfetti.usecase {
requires static lombok;
requires transitive ph.kana.examconfetti.model;
requires ph.kana.examconfetti.data;
exports ph.kana.examconfetti.usecase.interactor;
}
module-info.java of usecase module. This module requires the model module, and offers it to anyone that uses usecase module.In the module-info.java of usecase module, you can see that the data module is being required. This is because the usecase module needs the I/O related interfaces from the data module.
I made the usecase module see the data and model modulse by adding the them to its build.gradle dependencies block.
implementation project(':ph.kana.examconfetti.data')
implementation project(':ph.kana.examconfetti.model')dependencies block. Since the 2 modules are within this project, the project() method is used, and the locator string starts with a colon, rather than the usual gradle dependency format.At the point of creation of the Use-Case module, the Data module has only one Java file, which is the interface needed by the interactor class implementation to actually save or open a file.
Data Module
As mentioned earlier, data module will contain the codes that will communicate with the file system. In the system I'm making, there are 2 types of files that I will work with: the raw data file that will contain the questions and answers inputted by the user, and the PDF file that will be the real output of the system.
For now, I only plan to make the system save and load the questions file. To save the file, this is the plan:
- First, serialize the model to a string. This is to make it compatible with the operation I need to do later before saving. At first, I plan to use a
SerializableandObjectOutputStreamto serialize the models, but I think that I will have a problem in the future when I added fields to the class, or maybe rename the class. In the current implementation, I opted serialize the models into JSON strings. Here I usedjackson-databind. - After serialization, the string in compressed using Deflate. Pretty standard, this is the same algorithm used to create ZIP files. The classes and methods I need to compress the string is included in the standard library at
java.util.zippackage. This library accepts the raw bytes to be compressed and outputs the compressed bytes. - After compression, the bytes are encrypted using AES. The compression method is fairly standard; no external libraries used. Most of the method I used is from
javax.cryptoandjava.securitypackages. Maybe the only different stuff I did is I included theivwith the output byte array. - Finally, the compressed bytes will be written to a file. I'm thinking of adding magic numbers at the start of the file, just like PNG and PDF file headers. I just haven't thought of a value to add and I don't want to be long.
As for opening the file, I just need to reverse the operations:
- Open file and get the byte stream.
- Decrypt the file using AES.
- Deflate bytes and encode bytes to string.
- Deserialize object from string.
In this module, I have another 3rd-party library installed – jackson-databind. Just like what I did in the model module, I configured the module paths again to enable me to use jackson-databind.
plugins.withType(JavaPlugin).configureEach {
    java {
        modularity.inferModulePath = true
    }
}build.gradle configuration to enable using the dependencies as modules.After this, it is now possible to add jackson-databind to the module-info.java.
module ph.kana.examconfetti.data {
    requires ph.kana.examconfetti.model;

    requires static lombok;
    requires com.fasterxml.jackson.databind;

    exports ph.kana.examconfetti.data.persistence;
    opens ph.kana.examconfetti.data.persistence.impl
        to com.fasterxml.jackson.databind;
}
module-info.java of data module. Here I added com.fasterxml.jackson.databind.Another different thing I did with its module-info.java is the usage of opens keyword. Remember that opens keywords enables the 1st package (before the to keyword) to be reflected by the code in the 2nd package (after the to keyword). This is to let jackson-databind read the objects fields and data to be serialized to a JSON string.
Addtionally, rather than adding the serializer's annotations to the model class, which is wrong according to Clean Architecture, I have created a separate data class that will be the target of serialization. It just accepts the original model object in its constructor.
import lombok.Data;
import lombok.NoArgsConstructor;
import ph.kana.examconfetti.model.ExamItem;

@Data
@NoArgsConstructor
class ExamItemJson {
    private int i;
    private String q;
    private String a;

    ExamItemJson(ExamItem item, int index) {
        i = index;
        q = item.getQuestion();
        a = item.getAnswer();
    }

    public ExamItem toExamItem() {
        var item = new ExamItem();
        item.setQuestion(q);
        item.setAnswer(a);
        return item;
    }
}ExamItemJson class that is used to serialized ExamItem.In this class, instead of naming the fields just like how it was named in the original model, I have renamed the fields to a single letter; hoping that I can save a few bytes in the disk with it. For example, question is now q and answer is now a.
IoC Container
Now that I have the usecase and data modules made, I just need to make them work together.
The concept of the IoC container in my system is relatively simple: create a Map of types to its instance. This design is flawed, especially when having multiple dependencies of the same type, but with the architecture in mind – it isn't a problem. I don't plan on making wire-by-name DI's.
public final class IocContainer {

    private IocContainer() {}

    private static final Map<Class<?>, Object> DEPENDENCIES = Dependencies.initialize();

    @SuppressWarnings("unchecked")
    public static <T> T fetchDependency(Class<T> type) {
        if (DEPENDENCIES.containsKey(type)) {
            return (T) DEPENDENCIES.get(type);
        } else {
            throw new UnknownDependencyException(type);
        }
    }
}
IocContainer class that will be used across modules. The fetchDependency() method should work like Spring Framework's getBean() method.On how Dependencies.initialize() work, I emulated how Spring creates its beans, but less elegant. Instead of having method that defines a single bean (like @Bean methods) I made all the dependencies inside a single method. Maybe I can refactor this in the future...
class Dependencies {

    private Dependencies() {}

    public static Map<Class<?>, Object> initialize() {
        var examGateway = new ExamGatewayImpl(
            new CompressionService(),
            new EncryptionService(),
            new SerializationService()
        );
        var saveExam = new SaveExamImpl(examGateway);
        var openExamFile = new OpenExamFileImpl(examGateway);

        return Map.of(
            ExamGateway.class, examGateway,
            SaveExam.class, saveExam,
            OpenExamFile.class, openExamFile
        );
    }
}
Dependencies.initialize() method.All *Impl objects are instantiated here, pretty manual compared to Spring's @Component scan. Looking at how the it builds the classes and its dependencies, it uses the wire-by-constructor approach.
Since ioc module now needs the respective .impl package of the modules, those packages should be exported, too. Thankfully, Java allows exporting a package to a specific module, I did just that. I exported .impl package to ioc module only.
module ph.kana.examconfetti.usecase {
    requires static lombok;
    requires transitive ph.kana.examconfetti.model;
    requires ph.kana.examconfetti.data;

    exports ph.kana.examconfetti.usecase.interactor;
    exports ph.kana.examconfetti.usecase.interactor.impl
        to ph.kana.examconfetti.ioc; // ADDED THIS EXPORT
}module-info.java of usecase module. The last export statement has been added to expose its .impl package to ioc module.module ph.kana.examconfetti.data {
requires ph.kana.examconfetti.model;
requires static lombok;
requires com.fasterxml.jackson.databind;
exports ph.kana.examconfetti.data.persistence;
exports ph.kana.examconfetti.data.persistence.impl
to ph.kana.examconfetti.ioc; // ADDED THIS EXPORT
opens ph.kana.examconfetti.data.persistence.impl
to com.fasterxml.jackson.databind;
}
module-info.java of data module. Same as the updated usecase module above.Application Module
This module will be the most complicated module from the others. As I said before, this module contains the UI, application behavior, and application runner.
Since I know from the start that this system will be using JavaFX as its UI, I worked first in its build.gradle file.
First I needed the JavaFX-related dependencies installed. So I added the following lines to the dependencies block:
implementation('org.openjfx:javafx-controls:11.0.2')
implementation('org.openjfx:javafx-fxml:11.0.2')
implementation('org.openjfx:javafx-graphics:11.0.2')javafx-controls for the control UI components, javafx-fmxl for FXML file support, and javafx-graphics for drawing the UI components to the desktop.With this, I can now use the javafxplugin (Gradle plugin) in my build.gradle file. First is I enabled the javafxplugin in the plugins block:
plugins {
    id 'java'
    id 'org.openjfx.javafxplugin' version '0.0.9'
}plugins block. This should be found at the top of the build.gradle file.Then, I added this block somewhere at the bottom of the build.gradle file:
javafx {
    version = '11.0.+'
    modules = [
        'javafx.controls',
        'javafx.fxml',
        'javafx.graphics'
    ]
}javafxplugin. This will enable the javafx.* modules to be found by module-info.java file.With this minimal setup, I tried creating a simple FXML file with a "Hello World" label. It did not work due to multiple problems.
First, the app module is not set to be an application. It can't run a Java application or even locate the main method. This is fixed by adding the application plugin to the plugins block and setting the mainClassName in the application configuration.
plugins {
    id 'java'
    id 'application'
    id 'org.openjfx.javafxplugin' version '0.0.9'
}application plugin now added in the plugins block.application {
mainClassName = 'ph.kana.examconfetti.app/ph.kana.examconfetti.app.Main'
}mainClassName configuration in the application block. Notice that fully-qualified class name is now different after Java 8, it is now in $module/$package.$class format.Another problem is the lombok does not work. Unlike the other modules, the lombok in the app module does not work. Gradle reports that the dependency inside lombok cannot be found in my project. After searching for the fix in this problem, they suggested that add the missing dependency in the build.gradle file just to make it work.
implementation('org.mapstruct:mapstruct-processor:1.3.0.Final') // ugly fixmapstruct-processor is not found in the project, and lombok needs it. Seems like an internal error from the project from what I understand.Lastly, there is a problem that the .fxml file cannot be located when running the application. The file is properly found when debugging, but in actual runtime it's not. The problem is caused by the compiled classes are looking at a different directory from the source code. This is fixed by configuring the source sets to use the same directory as the output directory.
sourceSets {
main.output.resourcesDir = main.java.outputDir
}sourceSets block added in the build.gradle file.Now that these problems are out of the way, we can now proceed with the actual application development. I used Gluon's Scene Builder to build my FXML files.
After, designing the FXML files and setting its controller, make sure to open the controller class's package to javafx.fxml and javafx.graphics to let the framework inject the FXML components to @FXML attributes in your controller class and enable @FXML methods to be used as event handlers.
opens ph.kana.examconfetti.app
to javafx.fxml, javafx.graphics;I don't really have plans on how to build the UI but I just kinda worked with the design that makes sense. After days of development and designing on-the-spot, this is how the Exam Confetti looks like right now:
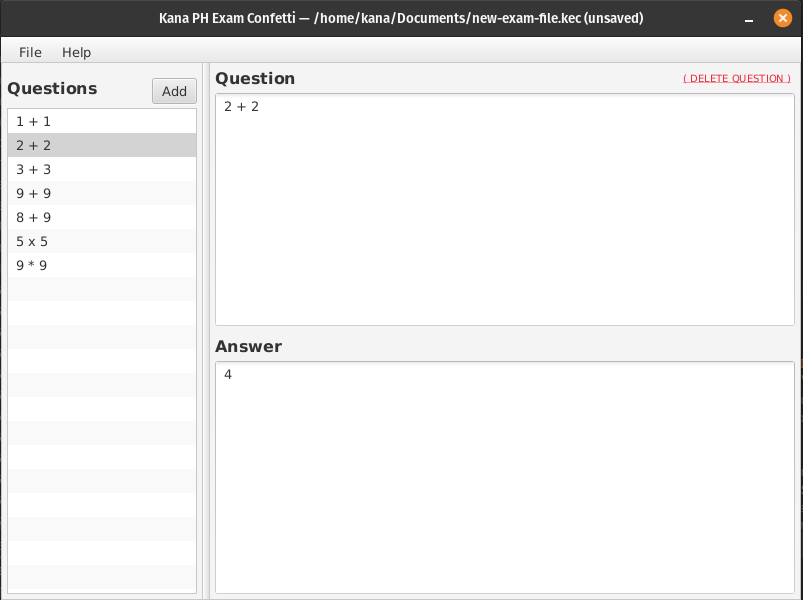
There are keybindings implemented for the drop-down menu of the application. Instead of using CTRL+key for the commands, I used SHORTCUT+key to make it compatible with both Mac and PC keybindings. The SHORTCUT flag translates to CTRL in PC or Command / ⌘ in Mac.
As for the file format I created at the data module, I decided to name it KEC file format – for KanaPH Exam Confetti file. The file chooser dialogs that this system uses filters only *.kec files.
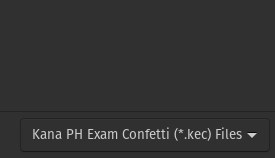
The data module itself does not know that it is called the *.kec file. It can read any file as long as it understands the configuration of bytes in it.
Now the main challenge is the management the application states. That's why I created a class that extends the model of the system and added application-related fields and methods in it:
public class ExamState extends Exam {
private int selectedIndex;
private boolean pristine;
private ExamState() {}
public static ExamState fromExam(Exam exam) {
var examState = new ExamState();
examState.file = exam.getFile();
examState.items = new ArrayList<>();
var examItems = exam.getItems();
if (examItems != null && !examItems.isEmpty()) {
examState.items = exam.getItems();
}
examState.selectedIndex = -1;
examState.pristine = true;
return examState;
}
// Other methods...
}selectedIndex and pristine.The field selectedIndex is mostly used to track which exam item will be shown in the screen. This is the index that will be targeted with delete. The pristine state just tracks whether the object is updated or not. In the omitted setter methods, the pristine is set to false. This state is used to block the user from exiting or closing the current exam without saving.
I am currently contemplating with the design of that class. I'm thinking that I should have composed that class with Exam instead of extending Exam. For now, I'm gonna focus on implementing error handling and other confirmation-related features.
Project Structure
After all the coding done, the project now looks like this:
exam-confetti/
+- gradle
| +- wrapper
| +- // Gradle Wrapper Files
+- ph.kana.examconfetti.app
| +- src
| | +- main
| | | +- java
| | | | +- // Java codes
| | | | +- module-info.java
| | | +- resources
| | | +- // FXML files
| | +- test
| | +- // Unit test codes
| +- build.gradle
+- ph.kana.examconfetti.data
| +- src
| | +- main
| | | +- java
| | | | +- // Java codes
| | | | +- module-info.java
| | | +- resources
| | +- test
| | +- // Unit test codes
| +- build.gradle
+- ph.kana.examconfetti.ioc
| +- src
| | +- main
| | | +- java
| | | | +- // Java codes
| | | | +- module-info.java
| | | +- resources
| +- build.gradle
+- ph.kana.examconfetti.model
| +- src
| | +- main
| | | +- java
| | | | +- // Java codes
| | | | +- module-info.java
| | | +- resources
| +- build.gradle
+- ph.kana.examconfetti.usecase
| +- src
| | +- main
| | | +- java
| | | | +- // Java codes
| | | | +- module-info.java
| | | +- resources
| | +- test
| | +- // Unit test codes
| +- build.gradle
+- .editorconfig
+- .gitignore
+- gradlew
+- settings.gradleexam-confetti project.The actual files are omitted, since that list will be very long. We can all view the actual files when I actually push the code in a public git repository. // TODO push code to git!
Conclusion
This is the actual "notebook" part of this article. Here is the summary of all my experience shared in this article.
The plan is to create a JavaFX application using Java 11 with Java Modules and Gradle. As much as possible the design will stick to the Clean Architecture.
There are 5 modules to create, each with their own dependencies and configuration that is independent from each other: model, usecase, data, ioc, and app. Make sure to add the modules to the settings.gradle file at the root of the project directory.
All 5 build.gradle files in the project has this lines of code:
plugins.withType(JavaPlugin).configureEach {
java {
modularity.inferModulePath = true
}
}This is to make the dependencies installed by Gradle be usable in the Java Module's module-info.java.
Local modules in the project are referenced in the build.gradle files using the project() method in the implementation statement in the dependencies block.
implementation project(':ph.kana.examconfetti.data')
implementation project(':ph.kana.examconfetti.model')The creation of model and usecase modules are pretty much straight forward. Since according to the Clean Architecture, these classes should be POJO. The only violation I did is I used lombok in these classes.
The data module currently has the save and load feature of the raw model file. Saving the model has 4 steps: serialize, compress, encrypt, and save to file. Opening the file follows the reverse of the save operation.
The package that contains the object to be serialized from or deserialized to must be opened for com.fasterxml.jackson.databind – since the operation uses reflection.
The ioc module is the one that allows a module use an implementation from another module in an abstract way. I created this module instead of using the robust Spring Framework just because I wanted to try making one. Since the creation of this module, the .impl packages of the modules should be exported to the ioc module.
The app module is the largest and busiest module among the five modules. This module contains UI logic and application configurations. On the creation of the app module, several problems are encountered. That's why its build.gradle file looks like this:
plugins {
id 'java'
id 'application'
id 'org.openjfx.javafxplugin' version '0.0.9'
}
group 'ph.kana.examconfetti'
version '2020.10.0'
sourceCompatibility = 11
repositories {
mavenLocal()
mavenCentral()
}
dependencies {
implementation project(':ph.kana.examconfetti.ioc')
implementation project(':ph.kana.examconfetti.model')
implementation project(':ph.kana.examconfetti.usecase')
implementation('org.openjfx:javafx-controls:11.0.2')
implementation('org.openjfx:javafx-fxml:11.0.2')
implementation('org.openjfx:javafx-graphics:11.0.2')
implementation('org.projectlombok:lombok:1.18.12')
implementation('org.mapstruct:mapstruct-processor:1.3.0.Final') // ugly fix
annotationProcessor('org.projectlombok:lombok:1.18.12')
}
sourceSets {
main.output.resourcesDir = main.java.outputDir
}
application {
    mainClassName = 'ph.kana.examconfetti.app/ph.kana.examconfetti.app.Main'
}
javafx {
version = '11.0.+'
modules = [
'javafx.controls',
'javafx.fxml',
'javafx.graphics'
]
}
plugins.withType(JavaPlugin).configureEach {
java {
modularity.inferModulePath = true
}
}Addtionally, to make the @FXML annotations work in the controller classes, we need to open the controller package to javafx.fxml and javafx.graphics modules.
module ph.kana.examconfetti.app {
requires java.logging;
requires javafx.controls;
requires javafx.fxml;
requires javafx.graphics;
requires lombok;
requires ph.kana.examconfetti.ioc;
requires ph.kana.examconfetti.usecase;
opens ph.kana.examconfetti.app
	to javafx.fxml, javafx.graphics;
}
app module's module-info.java.Now, most of the basic features of the system works – such as opening and saving the file. There are still a lot to do, I hope to work more on this in the future!