
So I made an app with JavaFX using Kotlin, just because I want to try creating a desktop application using Kotlin.
As for the creation of the project, it is pretty similar as another of my project described in detail in another article.
The main difference in this project is I didn't use JPMS. I don't think we can do modules in Kotlin right now outside Gradle.
What is the App About
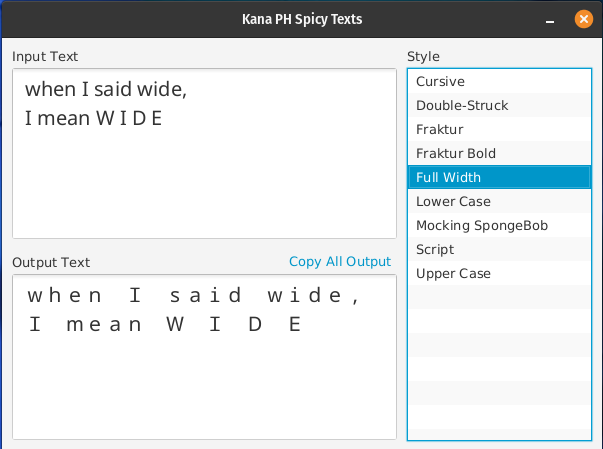
What this app does is it accepts some text, and formats it according to the selected style. This is used on social media to bypass the lack of formatting tools when creating a post or comment.
In Unicode, there are characters in the higher values that corresponds to bold, cursive, wide, etc... format of text. These characters can be pasted in social media platforms to make your posts look formatted.
In this app, we can just type plain text in the input field and copy the formatted texts from the output field.
Building the UI
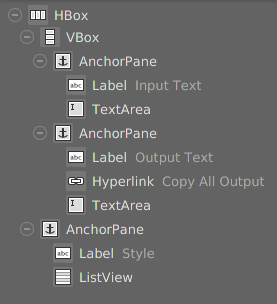
For the UI, I whipped up a simple design using the SceneBuilder: a text area for the input, and a text area for the output. I have also added a list view at the side to enable selection of text styles.
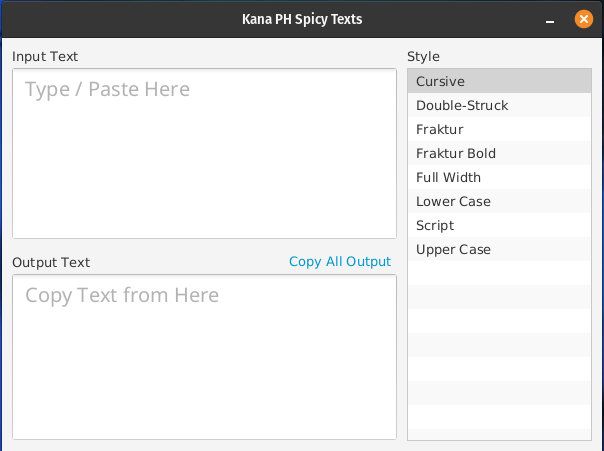
Additionally, a Copy All Output button hyperlink to copy all the text in the output text area offer convenience when copying texts. This is made possible by the JavaFX Clipboard API which I have used in my previous projects.
This seems to be the least number of components I ever used in a JavaFX project.
To give it life, the UI listens to few events:
- Text change listener for the input text area – This event is not an event of the text area but its text property. Because of this, the event is set inside the controller class rather than the FXML file itself. What it does is it formats the text in the output text area using the text from the input text area.
private fun initializeInputTextEvent() = inputTextArea.textProperty() .addListener { _, _, _ -> transformText() } - Mouse click event for the list view – This is a simple mouse click event that is set in the FXML file. What this does is it sets the current style state of the app, then calls the same method as the text change event to update the text in the output text area. Now the output text changes as soon as you click a new style.
@FXML fun changeStyle() = styleListView.selectionModel .selectedItem .let { TEXT_TRANSFORMERS[it] ?: NO_TRANSFORM } .also { selectedStyle = it } .also { transformText() } - Action event for the hyperlink – This is a straightforward event. It just copies the text from the output text area to the clipboard. After this, the formatted text can now be pasted to other applications.
@FXML
fun copyOutput() = ClipboardContent()
    .apply { putString(outputTextArea.text) }
    .also { Clipboard.getSystemClipboard().setContent(it) }
The the snippets above, we can see that the function transformText() does all the job transforming the text. It is a stateful function that fetches text transform information from the UI components.
private fun transformText() = inputTextArea.text
    .let(selectedStyle::transform)
.also { outputTextArea.text = it.trim() }textTransform() function creates the output text from the inputTextArea.text and selectedStyle which is set from the changeStyle() event listener.Text Transformers
From the snippets above, we can see multiple references to a text transformer. What is it anyways?
interface TextTransformer {
    val name: String
    fun transform(text: String): String
}
It's just an interface that will be implemented by different text transformers. The main method for the process is the transform(String): String method. As the signature suggests, it accepts a string then outputs a string – just like how the UI works in the bigger picture.
Here is a simple example:
class MockingSpongeBobTextTransformer : TextTransformer {
    override val name: String = "Mocking SpongeBob"

    override fun transform(text: String): String = text
        .split(" ")
        .joinToString(" ") { word ->
            word.mapIndexed { i, ch ->
                when (ch) {
                    'l', 'L' -> 'L'
                    'i', 'I' -> 'i'
                    else -> if (i % 2 == 0) ch.toLowerCase() else ch.toUpperCase()
                }
            }.joinToString("")
        }
}After implementing the interface, we just need to add it to the list of instances in the main controller class to make it appear in the UI:
private val TEXT_TRANSFORMERS: Map<String, TextTransformer> = listOf(
        UpperCaseTextTransformer(),
        LowerCaseTextTransformer(),
        FullWidthTextTransformer(),
        FrakturTextTransformer(),
        FrakturBoldTextTransformer(),
        DoubleStruckTextTransformer(),
        CursiveTextTransformer(),
        ScriptTextTransformer(),
        MockingSpongeBobTextTransformer() // Newly Added!
    )
    .map { it.name to it}
.toMap()MainController class.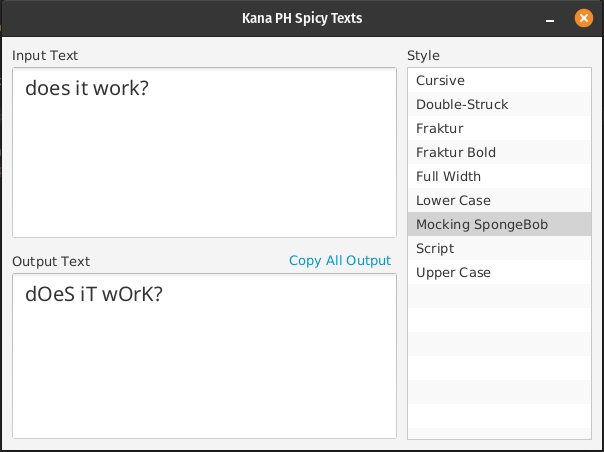
This all seem pretty simple because we are still using methods from the standard library to transform text. In the beginning of this project, I used simple text transforms such as .toLowerCase() and .toUpperCase() to test if the application will work end-to-end.
With that out of the way, I proceed to work with the characters in the higher Unicode table.
Higher Unicode Characters
Working with the higher Unicode characters looks complicated but are actually simple. What we need to do is to shift the ASCII value of the given string to the Unicode value of the targeted style.
For example, the first text transform I made is the Full Width text transform.
Find the value that is needed to make ASCII value of the text to full width character. To do that, I used this table from unicode.org that contains the values of full width characters: https://www.unicode.org/charts/PDF/UFF00.pdf.
Since now I know that Capital Letter A in full width characters is 0xff21, I just need to know the difference between it and Capital Letter A in ASCII (0x41).
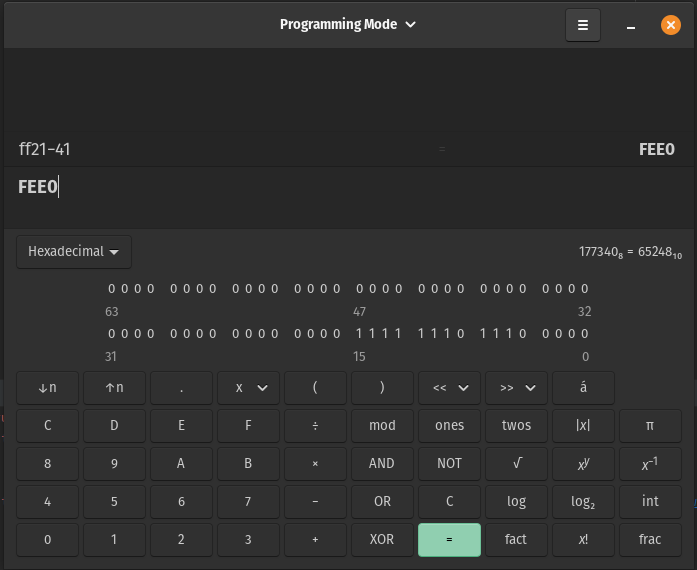
After consulting my calculator, I learned that I just need to shift the value by 0xfee0 and I'm done!
The next problem is the String data type. By default, strings are encoded in UTF-8. This is a problem since the the values I need to show is in UTF-16.
I solved this by storing the shifted values in a ByteBuffer first, then finally building a UTF-16 string from the resulting set of bytes.
override fun convert(text: String): String {
    val convertedBytes = ByteBuffer.allocate(text.length * Char.SIZE_BYTES)
    text.map { char -> char.toInt() + 0xfee0 }
        .map { int -> int.toChar() }
        .forEach(convertedBytes::putChar)
    return String(convertedBytes.array(), UTF_16)
}After this, I encountered a problem where the space character does to transform the way I want it to be. The reason is that the space character requires a different shift value that the readable characters. As a simple fix, I changed the shifting logic to hard-code a full width space when needed:
override fun convert(text: String): String {
    val convertedBytes = ByteBuffer.allocate(text.length * Char.SIZE_BYTES)
    text.map { char ->
            if (char == ' ') 0x3000
            else char.toInt() + 0xfee0
        }
        .map { int -> int.toChar() }
        .forEach(convertedBytes::putChar)
    return String(convertedBytes.array(), UTF_16)
}
After this, I encountered the same problem with newlines. It seems the number of hard-coded values are growing, that's why I decided to move them all out to their own private method:
private fun transformChar(char: Char): Char = when(char) {
     ' ' -> '\u3000'
    '\n' -> '\n'
    else -> (char.toInt() + 0xfee0).toChar()
}
With these, the FullWidthTextTransformer class is complete and I moved on to another implementations.
Going (More) Higher in the Unicode Table
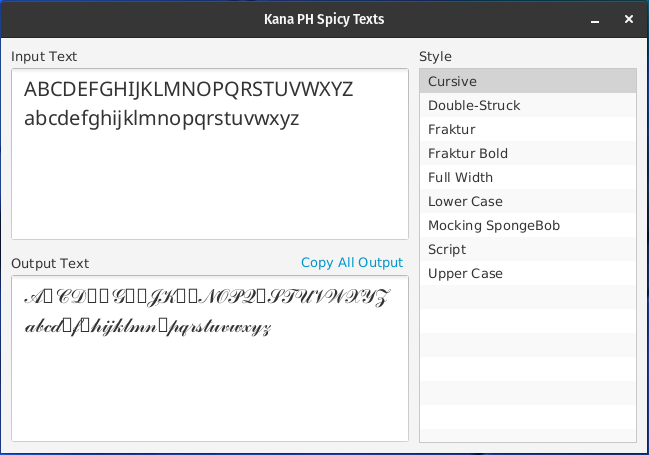
As I try to implement other text transformers, such as Cursive or Fraktur (Gothic), I noticed a problem. Their Unicode hex values has 5 digits! It means that UTF-16 cannot accommodate the characters and simple char value manipulations won't work!
Good thing that Kotlin API supports UTF-32 charset.
By using UTF-32, the usual 2-byte char is not applicable anymore. That is why I chose to use 2 short variables to represent a UTF-32 character. In this approach, I still encountered a problem. Kotlin is using the short as a signed data type rather than an unsigned one. I tried using the UShort data type to make it unsigned. Unfortunately, that was an experimental feature and the ByteBuffer.putShort(short) method does not accept values of that type.
That's why I chose to use Int rather than the actual Short data type. Now I am using Int but when adding to the ByteBuffer I cast it first to a Short. As for the higher bytes (3rd and 4th bytes) of the character, I'm still using Short since the value is usually 0 or 1 in the character sets that I am using right now.
data class UnicodeShift(
        val value: Int,
val leftPad: Short = ZERO_PAD)With this out of the way, I can subtract again the value from the higher Unicode to get the shift value. We just need to keep in mind to add the higher byte values at the left of the bytes in the ByteBuffer.
Since the logic to transform the characters to higher Unicode values are the same, I extracted the logic to an abstract class, and its implementations just sets the shift values. I also separated the shift values for upper case, lower case, numbers, and symbols because some encodings do have the character sets in different order unlike the Full-Width Text.
class FrakturTextTransformer
        : HigherUnicodeTextTransformer(
            upperCaseShift = UPPERCASE_SHIFT,
            lowerCaseShift = LOWERCASE_SHIFT,
            numbersShift = NO_SHIFT,
            symbolsShift = NO_SHIFT) {
    override val name: String = "Fraktur"

    companion object {
        private val UPPERCASE_SHIFT = UnicodeShift(value = 0xd4c3, leftPad = 1)
        private val LOWERCASE_SHIFT = UnicodeShift(value = 0xd4bd, leftPad = 1)
    }
}FrakturTextTransformer class that just sets the shift values.Now that the bits are arranged, I just need to encode it as a string and show it in the UI!

With all of that, I took some time to implement other fonts, too. Now after adding all the fonts that I need, I should now look on what to do next with the app or maybe look at the problems first and fix them.
I have a set plan for the app. I will list it here to serve as a to-do list for my future self.
What's Next
Fix Broken Fonts
After playing around with the app a bit, I notice that some symbols are not showing in the screen.
I tried adding new font by loading the TTF file before the FXML file:
this.javaClass
    .getResource("/ph/kana/spicytexts/app/NotoSans-Regular.ttf")
    .apply { Font.loadFonts(toExternalForm(), DEFAULT_FONT_SIZE) }

val mainFormFxml = this.javaClass
    .getResource("/ph/kana/spicytexts/app/main-form.fxml")
val loader = FXMLLoader(mainFormFxml)
val scene = Scene(loader.load())NotoSans-Regular.ttf file before loading the FXML file in the start() method..text-box {
-fx-font-family: "Noto Sans";
-fx-font-size: 20px;
}.text-box FXML class.After all that, there are still missing symbols. Maybe I just need to find a better TTF to use, or maybe there is just something wrong with the way I'm doing things? Either way, it is an issue to fix.
Correct Way to Shift Unicode Values
Apparently, there is a way to convert to higher Unicode values without converting the string from UTF-8 to UTF-16 or UTF-32. What I'm currently doing feels like a hack and inefficient, so I read more about it.
This Wikipedia Article shows how a multi-byte Unicode character is encoded in UTF-8. I should have done it this way, but I have already implemented a way to convert text to a formatted text.
Since there is a correct way to show such characters in UTF-8, I should just do that.
More Fonts
This is a straight-forward one! There should be more choices when it comes to font. The plan is I'll only do it when I need a font. But for now, I should fix the problems with the font and encoding first to make adding new fonts easier.
Additionally, I want to learn on how to extend an application using an external JAR file. I was thinking to create a way to add new fonts without modifying the original executable file and add the new fonts as plugins. I have seen a few projects that does something similar to that. For example: Project Lombok's @Log and Tachiyomi's Extensions.
Still, I'm not sure if I should stick with a monolithic approach or the external JAR file approach. But something in me tells that learning to extend with a JAR file is a good skill to learn!